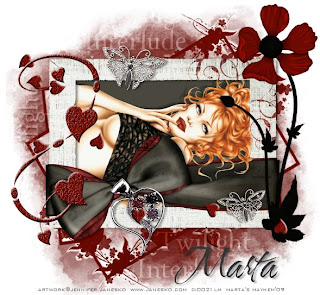
Click the tag to preview at full size. This tutorial was written by Marta on May 5, 2009. Any resemblance to any other tutorial is coincidental. Do not copy and paste this tutorial elsewhere on the net. Absolutely NO Scripting and/or translating of this tutorial.
For this tutorial you will need:
PSP
Tube of choice
Font of choice (WaterBrushROB)
Mask - BflyFlbyMask31 - You can download it HERE.
Mask of choice
ScrapKit *Twilight* by Jo of Creationz by Jo.
You can purchase it HERE.
I am using the artwork of Jennifer Janesko, you can find her licensed art at CILM.
Let's get started:
Open a new image 600x550 and background set to white. Copy & paste paper10 as a new layer. Open BflyFlbyMask31, Layers/New Mask Layer/From Image and find the mask in the drop down list. Delete mask layer, and merge group.
Copy & paste paper10 as a new layer. Open mask of choice, Layers/New Mask Layer/From Image and find the mask in the drop down list. Delete mask layer, and merge group. Lower opacity to 65%.
Copy & paste wrapframe4 as a new layer. Using your Magic Wand, click inside the wrapframe. Selections/Modify/Expand by 5, New raster layer, set your foreground to #353535 and floodfill the selection and move this layer under the wrapframe. Keep selected. Copy & paste your tube as a new layer and move under the wrapframe layer. Selections/Invert and hit Delete on the tube layer. Add drop shadow to wrapframe and tube layers. Selections/None.
Add any additional flowers, ribbons, charms, butterflies, hearts, or elements of your choice.
Crop or resize to your liking. Add your text, copyright info, and watermark, and save as a jpg, png, or gif file.
That's it.. all done!

No comments:
Post a Comment