Wednesday, December 30, 2009
Thursday, December 24, 2009
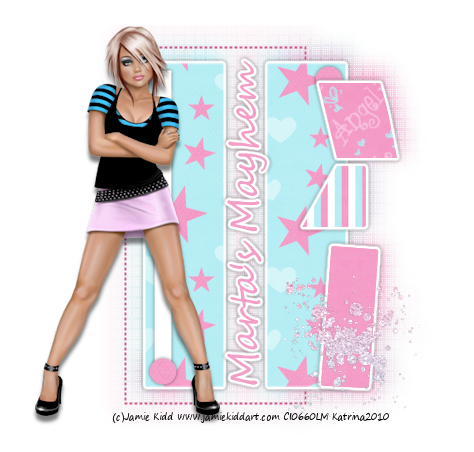
TAG OFFER ♥ I'm A Starr ♥

Click the tag to preview at full size.
If you would like this tag, please email me HERE. Please put "I'm A Starr" in the subject line when requesting. Thank you!
I'm using the ScrapKit *BFFL* by Amy of Amy's Scrap Place. You can purchase it HERE.
I am using my Template #11.
I am using the artwork of Jamie Kidd, you can find his licensed art at CILM.

TAG OFFER ♥ Picture This ♥

Wednesday, December 23, 2009


Tuesday, December 22, 2009
TAG OFFER ♥ The Lioness ♥


♥ Caramel Coffee ♥

This is a tag I made using my Template #8. If anyone would like one, please email me!
Monday, December 21, 2009
♥ Winter Wonderland ♥

Click the tag to preview at full size. This tutorial was written by Marta on December 21, 2009. Any resemblance to any other tutorial is coincidental. Do not copy and paste this tutorial elsewhere on the net. Absolutely NO Scripting and/or translating of this tutorial.
For this tutorial you will need:
PSP
Tube of choice
Font of choice (I used Albemarle Swash)
Mask of choice
Doodles of choice
ScrapKit *Winter Wonderland* by Diane at Candy's Treats.
You can purchase it HERE.
I am using the artwork of Elian Chatzoudis, you can find his licensed art at MPT.
Let's get started:
Open a new image 600x500 and background set to white. Copy & paste Paper5 as a new layer. Open your mask of choice, Layers/New Mask Layer/From Image and find the mask in the drop down list. Delete mask layer, and merge group.
Copy & paste FrameSnow2 as a new layer. Using your magic wand, holding down the shift key, select each frame, Selections/Modify/Expand by 5. Open a new raster layer. Copy paper2 and paste into selection, select none.
Copy & paste your tube of choice. Duplicate. Close out the original. Select all, Float, Defloat, Modify, Feather, set to 53, Invert and hit delete until you get the desired effect. Change opacity to 63 and move under the frame layer.
Copy & paste Bow1 as a new layer, and move to the upper right of the frame. Add drop shadow.
Add doodles of your choice and place at the left lower corner of the frame. Duplicate, Mirror/Flip and place at the right upper corner of the frame.
Open up your original tube layer and move to desired position, and add drop shadow.
Add any additional elements of your choice.
Crop or resize to your liking. Add your text, copyright info, and watermark, and save as a jpg, png, or gif file.
That's it.. all done!


Tuesday, December 15, 2009
TAG OFFER ♥ Raspberry Delight ♥

Saturday, December 12, 2009

Friday, December 11, 2009
TAG OFFER ♥ Winter Magic II ♥

Click the tag to preview at full size.
If you would like this tag, please email me HERE. Please put "Winter Magic II" in the subject line when requesting. Thank you!
I'm using the ScrapKit *A Touch of Winter Magic* by Ali of Designs By Ali. You can purchase it HERE.
I am using the artwork of Elias Chatzoudis, you can find his licensed art at MPT.
Sunday, November 15, 2009
TAG OFFER ♥ Winter Magic ♥

Click the tag to preview at full size.
If you would like this tag, please email me HERE. Please put "Winter Magic" in the subject line when requesting. Thank you!
I'm using the ScrapKit *A Touch of Winter Magic* by Ali of Designs By Ali. You can purchase it HERE.
I am using the artwork of PinUpToons, you can find his licensed art at CILM.
Thursday, November 12, 2009
TAG OFFER ♥ Blue Christmas ♥

Click the tag to preview at full size.
If you would like this tag, please email me HERE. Please put "Blue Christmas" in the subject line when requesting. Thank you!
I'm using the ScrapKit *O Christmas-Blue* by Ali of Designs By Ali. You can purchase it HERE.
I am using the artwork of PinUpToons, you can find his licensed art at CILM.
Saturday, November 7, 2009
TAG OFFER ♥ Xmas Baby ♥

Click the tag to preview at full size.
If you would like this tag, please email me HERE. Please put "Xmas Baby" in the subject line when requesting. Thank you!
I'm using the ScrapKit *Xmas* by Marie of Sky Scraps Designs. You can purchase it HERE.
I am using the artwork of PinUpToons, you can find his licensed art at CILM.
I am using the artwork of PinUpToons, you can find his licensed art at CILM.

Saturday, October 31, 2009
♥ Winter Wishes ♥

Click the tag to preview at full size. This tutorial was written by Marta on October 31, 2009. Any resemblance to any other tutorial is coincidental. Do not copy and paste this tutorial elsewhere on the net. Absolutely NO Scripting and/or translating of this tutorial.
For this tutorial you will need:
PSP
Tube of choice
Font of choice (I used Babylonica)
Mask - WSL_Mask84 - You can download HERE.
ScrapKit *Winter Wishes* by Rachel at Rachelz Expressionz.
You can purchase it HERE.
I am using the artwork of Zindy S. D. Nielsen, you can find her licensed art HERE.
Let's get started:
Open a new image 600x600 and background set to white. Copy & paste Paper2 as a new layer. Open WSL_Mask84, Layers/New Mask Layer/From Image and find the mask in the drop down list. Delete mask layer, and merge group.
Open Paper3. Set your foreground to null and your background to pattern. Find Paper3. Using your Eclipse Tool draw out a circle, see my tag for reference. Add drop shadow.
Open Paper4. Set your foreground to null and your background to pattern. Find Paper4. Using your Rectangle Tool draw out a narrow rectangle, see my tag for reference. Add drop shadow. Duplicate 2 times. See my tag for reference of placement.
Copy & paste Frame2 as a new layer. Resize by 40%. Copy & paste Paper2 as a new layer and move under the frame layer. Copy & paste your tube of choice and move it under the frame layer. When happy with placement, using your Magic Wand, click inside the frame, Selections/Modify/Expand by 4/Selections/Invert and hit Delete on the tube and paper layers. Add drop shadow to your tube and frame. Merge these three layers. Duplicate 2 times. On the copy layer, Image/Mirror and place side by side with the original layer. On the copy(2) layer, Image/Rotate/Left 90 degrees and place below the other layers. See my tag for reference.
Copy & paste your tube of choice and add drop shadow.
Add any additional elements of your choice.
Crop or resize to your liking. Add your text, copyright info, and watermark, and save as a jpg, png, or gif file.
That's it.. all done!
Thursday, October 22, 2009
♥ Chrimbo Time ♥

Click the tag to preview at full size. This tutorial was written by Marta on October 22, 2009. Any resemblance to any other tutorial is coincidental. Do not copy and paste this tutorial elsewhere on the net. Absolutely NO Scripting and/or translating of this tutorial.
For this tutorial you will need:
PSP
Tube of choice
Font of choice (I used CityHeatROB)
Mask of choice
ScrapKit *Happy Chrimbo* by Ali at Designs by Ali.
You can purchase it HERE.
I am using the artwork of PinUpToons, you can find his licensed art at CILM.
Let's get started:
Open a new image 550x550 and background set to white. Copy & paste Paper21 as a new layer. Open your mask of choice, Layers/New Mask Layer/From Image and find the mask in the drop down list. Delete mask layer, and merge group.
Copy & paste Frame3 as a new layer. Copy & paste Paper15 as a new layer and move under the frame layer. Using your Magic Wand, click inside the frame, Selections/Modify/Expand by 7/Selections/Invert and hit Delete on the paper layer. Add drop shadow.
Copy & paste the Calendar as a new layer and move it to the lower right of the frame. Image/Rotate/Right/17 degrees. Using your Eclipse Tool, draw a circle around the number 25.
Add any additional sleighs, bows, baubles, candles, or elements of your choice.
Crop or resize to your liking. Add your text, copyright info, and watermark, and save as a jpg, png, or gif file.
That's it.. all done!
Wednesday, October 21, 2009
♥ Mélodie de Clair de Lune ♥

Click the tag to preview at full size. This tutorial was written by Marta on October 21, 2009. Any resemblance to any other tutorial is coincidental. Do not copy and paste this tutorial elsewhere on the net. Absolutely NO Scripting and/or translating of this tutorial.
For this tutorial you will need:
PSP
Tube of choice
Font of choice (I used Albemarle Swash)
ScrapKit *Clair de Lune* by Stina at designed by stina...again.
You can purchase it HERE.
I am using the artwork of Walter Girotto, you can find his licensed art at MPT.
Let's get started:
Open a new image 525x500 and background set to white. Copy & paste GlitterBling01 as a new layer. Copy & paste LoveNotes as a new layer.
Copy & paste Frame01 as a new layer. Copy & paste Paper04 as a new layer and move under the frame layer. Copy & paste your tube of choice and add drop shadow to your tube. Using your Magic Wand, click inside the frame, Selections/Modify/Expand by 7/Selections/Invert and hit Delete on your paper and tube layers. Add drop shadow to your frame layer.
Copy & paste Piano02 as a new layer, resize, and move to the right side of the frame. Copy & paste Candles01 as a new layer and resize. Place the Candles on the piano. Add drop shadows.
Copy & paste Bougainvillea01 as a new layer and place at the left of frame. Copy & paste Flower02 as a new layer and place at the lower left of the frame. Duplicate and move above and to the left of the original layer. Add drop shadow to all.
Add any additional flowers, bows, ribbons, doodles, or elements of your choice.
Crop or resize to your liking. Add your text, copyright info, and watermark, and save as a jpg, png, or gif file.
That's it.. all done!
Sunday, October 18, 2009
♥ Blooming Pink ♥

Click the tag to preview at full size. This tutorial was written by Marta on October 18, 2009. Any resemblance to any other tutorial is coincidental. Do not copy and paste this tutorial elsewhere on the net. Absolutely NO Scripting and/or translating of this tutorial.
For this tutorial you will need:
PSP
Tube of choice
Font of choice (I used Send Flowers)
Mask of choice
ScrapKit *Summer Melody* by Shelly at KairinaKat Kreations.
You can purchase it HERE.
I am using the artwork of PinUpToons, you can find his licensed art at CILM.
Let's get started:
Open a new image 500x500 and background set to white. Copy & paste Paper32 (15) as a new layer. Open your mask of choice, Layers/New Mask Layer/From Image and find the mask in the drop down list. Delete mask layer, and merge group.
Copy & paste element66(31) (frame) as a new layer. Copy & paste Paper23 (24) as a new layer and move under the frame layer. Using your Magic Wand, click inside the frame, Selections/Modify/Expand by 5/Selections/Invert, and hit Delete on your paper layer. Add drop shadow to your frame.
Copy & paste element66(11) as a new layer and place above the frame. Using your text tool, write out a quote of your choice.
Copy & paste element66(64) as a new layer and place at the lower left of the frame.
Copy & paste element66(30) as a new layer and place at the lower right of the frame.
Add any additional flowers, bows, ribbons, beads, tags, or elements of your choice.
Crop or resize to your liking. Add your text, copyright info, and watermark, and save as a jpg, png, or gif file.
That's it.. all done!
Friday, October 16, 2009
♥ Lovely in Green ♥

Click the tag to preview at full size. This tutorial was written by Marta on October 16, 2009. Any resemblance to any other tutorial is coincidental. Do not copy and paste this tutorial elsewhere on the net. Absolutely NO Scripting and/or translating of this tutorial.
For this tutorial you will need:
PSP
Tube of choice
Font of choice (I used 2Peas Airplanes)
Mask of choice
ScrapKit *Woodsy* by Jill at Created by Jill.
You can purchase it HERE.
I am using the artwork of PinUpToons, you can find her licensed art at CILM.
Let's get started:
Open a new image 550x500 and background set to white. Copy & paste Paper08 as a new layer. Open your mask of choice, Layers/New Mask Layer/From Image and find the mask in the drop down list. Delete mask layer, and merge group.
Open Paper06. Set your background color to nul, and your foreground to Pattern, and find the Paper06. Using your Eclipse Tool, draw out a circle. See my tag above for reference to size.
Open Paper09. Set your background color to nul, and your foreground to Pattern, and find the Paper09. Using your Rectangle Tool, draw out a rectangle. See my tag above for reference to size.
Copy & paste frame1 as a new layer. Copy & paste paper01 as a new layer and move under the frame layer. Copy & paste your tube as a new layer. Duplicate and close out the original. Image/Mirror and move under the frame layer, and position to your likeness. Using your Magic Wand, click inside the frame, Selections/Modify/Expand by 5/Selections/Invert and hit Delete on your paper and tube layers. Working on the tube layer, Adjust/Hue and Saturation/Colorize/Set to H/20, S/132. Add drop shadow to the frame and tube layers.
Copy & paste the bracket as a new layer. Duplicate. Image/Mirror. Image/Rotate/Left 15. Add drop shadows.
Open up your tube and move to desired position. Add drop shadow.
Add any additional flowers, bows, ribbons, buttons, butterflies, or elements of your choice.
Crop or resize to your liking. Add your text, copyright info, and watermark, and save as a jpg, png, or gif file.
That's it.. all done!
Thursday, October 15, 2009
TAG OFFER ♥ Friends ♥


Monday, October 12, 2009
♥ Beauty Comes From The Heart ♥

Click the tag to preview at full size. This tutorial was written by Marta on October 12, 2009. Any resemblance to any other tutorial is coincidental. Do not copy and paste this tutorial elsewhere on the net. Absolutely NO Scripting and/or translating of this tutorial.
For this tutorial you will need:
PSP
Tube & Image of choice
Font of choice (I used Burgues Script)
Mask of choice
ScrapKit *Love Unturned* by Jessica at Gothic Inspirations.
You can purchase it HERE.
I am using the artwork of Jennifer Janesko, you can find her licensed art at CILM.
Let's get started:
Open a new image 500x575 and background set to white. Copy & paste Paper10 as a new layer. Open your mask of choice, Layers/New Mask Layer/From Image and find the mask in the drop down list. Delete mask layer, and merge group.
Copy & paste the Glitter as a new layer.
Copy & paste the HeartGlitter-Green as a new layer. Copy & paste your image of choice as a new layer and move under the HeartGlitter. Using your Magic Wand, click inside the HeartGlitter, making sure you select all pieces, Selections/Modify/Expand by 4/Selections/Invert and hit Delete on the image layer. Add drop shadow to Heart Glitter. Merge the HeartGlitter and image layer.
Duplicate. Working on the original layer, Adjust/Blur/Gaussian Blur/Set to 10.
Copy & paste your tube of choice.
Add any additional flowers, bows, ribbons, butterflies, or elements of your choice.
Crop or resize to your liking. Add your text, copyright info, and watermark, and save as a jpg, png, or gif file.
That's it.. all done!
Friday, October 9, 2009
♥ Spooky Midnight ♥

Click the tag to preview at full size. This tutorial was written by Marta on October 9, 2009. Any resemblance to any other tutorial is coincidental. Do not copy and paste this tutorial elsewhere on the net. Absolutely NO Scripting and/or translating of this tutorial.
For this tutorial you will need:
PSP
Tube of choice
Font of choice (I used Amorinda)
Mask - WSL_Mask81 - You can download HERE.
ScrapKit *Circle Midnight* by Jay at Heartbeatz Creationz.
You can purchase it HERE.
I am using the artwork of Keith Garvey, you can find his licensed art at MPT.
Let's get started:
Open a new image 500x600 and background set to white. Open new raster layer and using your Floodfill Tool, floodfill with #523D6C. Open WSL_Mask81, Layers/New Mask Layer/From Image and find the mask in the drop down list. Delete mask layer, and merge group.
Copy & paste element29 (leave) as a new layer, resize by 75%, and move to the left side of your canvas. Duplicate. Image/Mirror. Merge these 2 layers. Duplicate 2X, and move above and below the first merged layer. Duplicate. Image/Rotate/Left/90 degrees and move to the top of your canvas. Duplicate, and move to the bottom of your canvas. You want to end up with 8 leaves.
Copy & paste element36 (frame) as a new layer. Using your Magic Wand, click inside the frame, Selections/Modify/Expand by 5/Selections/Invert, keep selected, copy paper19, add new raster layer and move under the frame layer, and paste into selection. Select none. Add drop shadow to your frame.
Add any additional flowers, bows, ribbons, or elements of your choice.
Crop or resize to your liking. Add your text, copyright info, and watermark, and save as a jpg, png, or gif file.
That's it.. all done!
Wednesday, October 7, 2009
♥ Color of Creme ♥

Click the tag to preview at full size. This tutorial was written by Marta on October 7, 2009. Any resemblance to any other tutorial is coincidental. Do not copy and paste this tutorial elsewhere on the net. Absolutely NO Scripting and/or translating of this tutorial.
For this tutorial you will need:
PSP
Tube/Image of choice
Font of choice (I used Mr Keningbeck)
Mask - WSL_Mask84 - You can download HERE.
ScrapKit *Choco Creme* by Jen at Jen's Sweet Temptations.
You can purchase it HERE.
I am using the artwork of Jennifer Janesko, you can find her licensed art at CILM.
Let's get started:
Open a new image 550x500 and background set to white. Copy & paste Paper10 as a new layer. Open WSL_Mask84, Layers/New Mask Layer/From Image and find the mask in the drop down list. Delete mask layer, and merge group.
Copy & paste frame2 as a new layer. Image/Rotate/Left/90 degrees. Copy & paste your tube or image of choice, and move under the frame layer. Using your Magic Wand, click inside the frame, Selections/Modify/Expand by 5/Selections/Invert, and hit Delete on your tube/image layer. Add drop shadow to the frame and tube layers.
Copy & paste BFly3 and BFly1 as new layers, and move one to each side of the frame. Add drop shadow to both.
Add any additional flowers, bows, ribbons, or elements of your choice.
Crop or resize to your liking. Add your text, copyright info, and watermark, and save as a jpg, png, or gif file.
That's it.. all done!
Tuesday, October 6, 2009
♥ Persuasian Monarch ♥

Click the tag to preview at full size. This tutorial was written by Marta on October 6, 2009. Any resemblance to any other tutorial is coincidental. Do not copy and paste this tutorial elsewhere on the net. Absolutely NO Scripting and/or translating of this tutorial.
For this tutorial you will need:
PSP
Tubes/Images of choice
Font of choice (I used Portfolio)
Mask - Vix_Mask363 - You can download HERE.
ScrapKit *Monarchy* by Rieneke at Rieneke Designs.
You can purchase it HERE.
I am using the artwork of Jennifer Janesko, you can find her licensed art at CILM.
Let's get started:
Open a new image 600x500 and background set to white. Copy & paste Paper5 as a new layer. Open Vix_Mask363, Layers/New Mask Layer/From Image and find the mask in the drop down list. Delete mask layer, and merge group.
Copy & paste frame5 as a new layer. Copy & paste your tubes/images of choice for each frame, and move under the frame layer. Using your Magic Wand, click inside each frame. Selections/Modify/Expand by 7 Selections/Invert and hit Delete on your image/tube layers. Add drop shadow to the frame layer.
Copy & paste flower9 as a new layer and move to the bottom left of the frame. Duplicate. Image/Mirror and move to the bottom right of the frame. Add drop shadow.
Copy & paste bow2 as a new layer and move to the top center of the frame, add drop shadow.
Add any additional flowers, bows, butterflies, or elements of your choice.
Crop or resize to your liking. Add your text, copyright info, and watermark, and save as a jpg, png, or gif file.
That's it.. all done!
Sunday, October 4, 2009
♥ Star Quality ♥

Click the tag to preview at full size. This tutorial was written by Marta on October 4, 2009. Any resemblance to any other tutorial is coincidental. Do not copy and paste this tutorial elsewhere on the net. Absolutely NO Scripting and/or translating of this tutorial.
For this tutorial you will need:
PSP
Tube of choice
Font of choice (I used Sparkly)
Mask - Vix_Mask346 - You can download HERE.
ScrapKit *Black Star - Purple* by Tina at Tina's Magical Scrap World.
You can purchase it HERE.
I am using the artwork of Ismael Rac, you can find his licensed art at AMI.
Let's get started:
Open a new image 500x500 and background set to white. Copy & paste Paper16 as a new layer. Open Vix_Mask346, Layers/New Mask Layer/From Image and find the mask in the drop down list. Delete mask layer, and merge group.
Copy & paste StarFrame12 as a new layer, and add drop shadow. Copy & paste your tube as a new layer, move under the frame layer, and add drop shadow. Move your tube to desired position. Using your Selection Tool, outline your frame (this gets all the pieces), Selections/Invert and hit Delete on the tube layer. Keep selected, and add new raster layer and move under the tube layer. Using your floodfill tool, fill with #FFFFFF, select none. Image/Rotate/Left 25 degrees. Merge all.
Repeat the above but change the position of the tube, so it's a little different. Move under the first frame. Merge all.
Copy & paste the StarHangerBow1 as a new layer, resize, and move to the upper right of the second frame layer. Add drop shadow.
Copy & paste the GlitterStarDoodle2 as a new layer and move above the mask layer.
Add any additional flowers, bows, butterflies, or elements of your choice.
Crop or resize to your liking. Add your text, copyright info, and watermark, and save as a jpg, png, or gif file.
That's it.. all done!
Friday, October 2, 2009
♥ She's A Star ♥

Click the tag to preview at full size. This tutorial was written by Marta on October 2, 2009. Any resemblance to any other tutorial is coincidental. Do not copy and paste this tutorial elsewhere on the net. Absolutely NO Scripting and/or translating of this tutorial.
For this tutorial you will need:
PSP
Tube of choice
Font of choice (I used TwinkleStarROB)
Mask - Vix_Mask374 - You can download HERE.
ScrapKit *Black Star - Pink* by Tina at Tina's Magical Scrap World.
You can purchase it HERE.
I am using the artwork of Ismael Rac, you can find his licensed art at AMI.
Let's get started:
Open a new image 550x500 and background set to white. Copy & paste Paper3 as a new layer. Open Vix_Mask374, Layers/New Mask Layer/From Image and find the mask in the drop down list. Delete mask layer, and merge group.
Copy & paste Starsplash1 as a new layer, and move to upper part of the canvas. Duplicate. Image/Mirror/Image/Flip and move to the lower part of the canvas.
Copy & paste Starframe10 as a new layer, Copy & paste Paper4 as a new layer and move under the frame layer. Using your Magic Wand, click inside the frame, Selections/Modify/Expand by 7, hit Delete on the paper layer. Add drop shadow to the frame layer.
Copy & paste DazzlingFlower2 as a new layer, and move to the lower right side of the frame. Add drop shadow.
Copy & paste your tube of choice and move to desired position. Add drop shadow.
Add any additional flowers, bows, butterflies, stars, or elements of your choice.
Crop or resize to your liking. Add your text, copyright info, and watermark, and save as a jpg, png, or gif file.
That's it.. all done!
Wednesday, September 30, 2009
♥ BOO-tiful in Pink ♥

Click the tag to preview at full size. This tutorial was written by Marta on September 30, 2009. Any resemblance to any other tutorial is coincidental. Do not copy and paste this tutorial elsewhere on the net. Absolutely NO Scripting and/or translating of this tutorial.
For this tutorial you will need:
PSP
Tube of choice
Font of choice (I used Shaking Bones)
Mask - Monti's Blinds Mask - You can download it HERE.
ScrapKit *Pink is Boo-tiful* by Gina at KiKeKa Kits.
You can purchase it HERE.
Let's get started:
Open a new image 500 x 500 and background set to white. Copy & paste paper08 as a new layer. Open the Monti's Blinds Mask, Layers/New Mask Layer/From Image and find the mask in the drop down list. Delete mask layer, and merge group.
Copy & paste frame03 as a new layer. Copy & paste paper01 as a new layer and move under the frame layer. Using your Magic Wand, click inside the frame, Selections/Modify/Expand by 5, hit Delete on the paper layer. Add drop shadow.
Copy & paste witch01 as a new layer. Copy & paste wordart02 as a new layer and move to the left side of the frame. Image/Rotate/Left 25 degrees. Copy & paste the caldron as a new layer and move it to where it looks like the witch is holding it. Copy & paste the cat01 as a new layer and move to the left of the witch. Add drop shadows to all.
Add any additional flowers, bows, butterflies, ghosts, or elements of your choice.
Crop or resize to your liking. Add your text, copyright info, and watermark, and save as a jpg, png, or gif file.
That's it.. all done!
Monday, September 28, 2009
♥ Delicious Autumn ♥

Click the tag to preview at full size. This tutorial was written by Marta on September 28, 2009. Any resemblance to any other tutorial is coincidental. Do not copy and paste this tutorial elsewhere on the net. Absolutely NO Scripting and/or translating of this tutorial.
For this tutorial you will need:
PSP
Tube of choice
Font of choice (I used Persimmon)
Mask - WSL_Mask83 - You can download it HERE.
ScrapKit *Autumn Splendor* by Cindy at Digiscrapations.
You can purchase it HERE.
I am using the artwork of PinUpToons, you can find his licensed art at CILM.
Let's get started:
Open a new image 500 x 500 and background set to white. Copy & paste paper13 as a new layer. Open your WSL_Mask83, Layers/New Mask Layer/From Image and find the mask in the drop down list. Delete mask layer, and merge group.
Copy & paste the frame as a new layer. Copy & paste the flower as a new layer and move to the lower left of the frame layer. Copy & paste the wordart "Delicious Autumn" as a new layer. Image/Rotate/Left 45 degrees, and move to the upper left of the frame layer. Add drop shadow to all.
Using your Rectangle Tool, draw out a rectangle, with width set to 8, and convert to rastor layer. Copy & paste a paper of your choice for the background of the frame, I used paper13. Copy & paste your tube of choice and position to you liking, resize as needed. Using your Magic Wand, click inside the rectangle frame, Selections/Modify/Expand by 5, hit Delete on the paper and tube layers. Add drop shadow to the rectangle frame. Merge these 3 layers. Duplicate. Image/Mirror. Copy & paste the photohinge as a new layer, resize, and place between the 2 frames. Move to center of canvas.
Add any additional flowers, bows, ribbons, leaves, or elements of your choice.
Crop or resize to your liking. Add your text, copyright info, and watermark, and save as a jpg, png, or gif file.
That's it.. all done!
Friday, September 25, 2009
♥ Rocker Chick ♥

Click the tag to preview at full size. This tutorial was written by Marta on September 25, 2009. Any resemblance to any other tutorial is coincidental. Do not copy and paste this tutorial elsewhere on the net. Absolutely NO Scripting and/or translating of this tutorial.
For this tutorial you will need:
PSP
Tube of choice
Font of choice (I used Grunge)
Mask of choice
ScrapKit *Rockin Colab* by the designers at Creative Scraps.
You can purchase it HERE.
I am using the artwork of Elias Chatzoudis, you can find his licensed art at MPT.
Let's get started:
Open a new image 600 x 600 and background set to white. Copy & paste AJ_RockinCSS_Magenta as a new layer. Open your mask of choice, Layers/New Mask Layer/From Image and find the mask in the drop down list. Delete mask layer, and merge group.
Copy & paste BCS_Doodle as a new layer. Move to the upper left of your canvas. Duplicate. Move the duplicate doodle to the lower right of your canvas.
Copy & paste BCS_Frame as a new layer. Copy & paste your tube of choice as a new layer and erase any parts you don't want.
Add any additional flowers, bows, ribbons, butterflies, or elements of your choice.
Crop or resize to your liking. Add your text, copyright info, and watermark, and save as a jpg, png, or gif file.
That's it.. all done!
TAG OFFER ♥ Sailor Blues ♥


Wednesday, September 23, 2009
♥ Autumn Splendor ♥

Click the tag to preview at full size. This tutorial was written by Marta on September 23, 2009. Any resemblance to any other tutorial is coincidental. Do not copy and paste this tutorial elsewhere on the net. Absolutely NO Scripting and/or translating of this tutorial.
For this tutorial you will need:
PSP
Image of choice
Font of choice (I used Martina)
Mask of choice
ScrapKit *Autumn Splendor* by Marie of Sky Scraps Designs.
You can purchase it HERE.
I am using the artwork of Jennifer Janesko, you can find her licensed art at CILM.
Let's get started:
Open a new image 600 x 600 and background set to white. Copy & paste paper15 as a new layer. Open your mask of choice, Layers/New Mask Layer/From Image and find the mask in the drop down list. Delete mask layer, and merge group. Adjust/Add Noise/Set to Random @ 40%/Monochrome checked.
Copy & paste frame5 as a new layer. Using your Magic Wand click inside the frame making sure to get all pieces, copy & paste your image of choice, and move under the frame layer, and hit Delete on the image layer.
Copy & paste frame9 as a new layer. Move to the lower right of the first frame. See my tag above for reference. Using your Magic Wand click inside the frame, copy & paste your image of choice, resize by 50%, and move under the frame9 layer, and hit Delete on the image layer.
Copy & paste the leave as a new layer and move under the frame layers, and above the mask layer. Move to the upper left of the frames. Add drop shadow. Duplicate and move the copy to the lower right of the frames.
Add any additional flowers, bows, ribbons, butterflies, birds, or elements of your choice.
Crop or resize to your liking. Add your text, copyright info, and watermark, and save as a jpg, png, or gif file.
That's it.. all done!
Tuesday, September 22, 2009
♥ Anthony's Angels ♥

Click the tag to preview at full size. This tutorial was written by Marta on September 22, 2009. Any resemblance to any other tutorial is coincidental. Do not copy and paste this tutorial elsewhere on the net. Absolutely NO Scripting and/or translating of this tutorial.
For this tutorial you will need:
PSP
Tubes of choice - 4 tubes of same artist
Font of choice (I used Burgues Script and Bellagio NF)
Mask of choice
ScrapKit *Insane* by Rieneke of Rieneke Designs.
You can purchase it HERE.
I am using the artwork of Anthony Guerra, you can find his licensed art at CILM.
Let's get started:
Open a new image 600 x 600 and background set to white. New rastor layer and floodfill with #B31919. Open your mask of choice, Layers/New Mask Layer/From Image and find the mask in the drop down list. Delete mask layer, and merge group. Move this layer towards the top of your canvas. Duplicate. Image/Flip/Image/Mirror and move this layer towards the bottom of your canvas.
Copy & paste frame7 as a new layer. Open 3 of your tubes. Place one of the tubes under the frame layer, when happy with placement, using your Magic Wand, click inside the top frame, Selections/Modify/Expand by 4, Selections/Invert and hit Delete on the tube layer. Do this for the middle and bottom frame. Using your Selection Tool, outline the frame, new raster layer and floodfill with #000000, and move under the frame and tube layers. Add a white drop shadow to your frame.
Copy & paste your fourth tube to the side of the frame and add a large drop shadow.
Add any additional flowers, bows, ribbons, butterflies, or elements of your choice.
Crop or resize to your liking. Add your text, copyright info, and watermark, and save as a jpg, png, or gif file.
That's it.. all done!
Monday, September 21, 2009
FUN QUESTIONAIRE
My friend Susan over at Hippiedaze's Tutorials has passed this fun questionaire over to me so here's my results, thank you Susan, this was fun.
1. How long have you been using PSP, PS? It's been around 7 years now, I got hooked and there was no looking back.
2. How did you get into making tags, scrap kits? I met Debb in a msn group and she did lessons on the how to's, I learned a lot from her, and I thank her for helping me to learn psp, to make pages, and she got me hooked on writing tuts, which I told her I would never do.
3. Who`s your fave artist? Jennifer Janesko first and foremost. Then it's Rion, Garv and Elias. But there are so many fantastic artists out there and I appreciate all of them.
4. Who`s your favourite Scrap Designer? I really don't have a favorite, I love them all.
5. Which three blogs do you visit everyday? Designs by Ali, HorsePlay's Pasture, and whoever has something new on the blogs that I follow lol.
I will now pass this Questionnaire on to:
Twinky @ Twinky Dezines
Tam @ Just A Girl's Designs
Yvette @ Essence Of Creativity
Sunday, September 20, 2009
♥ Papillion Lace ♥

Click the tag to preview at full size. This tutorial was written by Marta on September 20, 2009. Any resemblance to any other tutorial is coincidental. Do not copy and paste this tutorial elsewhere on the net. Absolutely NO Scripting and/or translating of this tutorial.
For this tutorial you will need:
PSP
Tube of choice
Font of choice (I used DianaCTT)
Mask of choice
ScrapKit *Pavillion Lace* by Susan of Tootypup Scraps.
You can purchase it HERE.
I am using the artwork of Jennifer Janesko, you can find her licensed art at CILM.
Let's get started:
Open a new image 600 x 600 and background set to white. New rastor layer and floodfill with #AB9D74. Open your mask of choice, Layers/New Mask Layer/From Image and find the mask in the drop down list. Delete mask layer, and merge group. Adjust/Add Noise/Set to Random @ 75%/Monochrome checked.
Copy & paste frame2 as a new layer. Copy & paste paper11 as a new layer and move under the frame layer. Copy & paste deco1-OLBD as a new layer and move above the frame layer and to the top of the canvas. Duplicate. Image/Mirror/Image/Flip and move to the bottom of the canvas. Copy & paste your tube of choice as a new layer. Using your Magic Wand, click inside the frame, Selections/Modify/Expand by 5, Selections/Invert, and hit Delete on the paper and tube layers. Copy & paste bar4 as a new layer and place at the bottom of the frame. Add drop shadow to the frame and tube layers.
Add any additional flowers, bows, ribbons, butterflies, or elements of your choice.
Crop or resize to your liking. Add your text, copyright info, and watermark, and save as a jpg, png, or gif file.
That's it.. all done!
Friday, September 18, 2009
♥ Rain or Shine ♥

Click the tag to preview at full size. This tutorial was written by Marta on September 18, 2009. Any resemblance to any other tutorial is coincidental. Do not copy and paste this tutorial elsewhere on the net. Absolutely NO Scripting and/or translating of this tutorial.
For this tutorial you will need:
PSP
Tube of choice
Font of choice (I used Jana Thork)
Mask of choice
ScrapKit *Florinda* by Kat of KatNKDA
You can purchase it HERE.
I am using the artwork of Angela Newman, you can find her licensed art at AMI.
Let's get started:
Open a new image 500 x 525 and background set to white. Copy & paste paper01 as a new layer. Open your mask of choice, Layers/New Mask Layer/From Image and find the mask in the drop down list. Delete mask layer, and merge group.
Copy & paste element09 as a new layer. Copy & paste your image of choice, and move under the frame layer. Using your Magic Wand, click inside the frame, Selections/Modify/Expand by 5, Selections/Invert, and hit Delete on the image layer. Change opacity of the image to 61%. Add drop shadow to frame. Copy & paste element14 as a new layer and move under the frame layer. Using your eraser tool, erase any that stick out paste the frame layer.
Copy & paste element11 as a new layer and place above the frame layer and center. Add drop shadow.
Copy & paste flower05 and flower06 as new layers, and place at the bottom right of the frame. Add drop shadows to both.
Add any additional flowers, bows, ribbons, or elements of your choice.
Crop or resize to your liking. Add your text, copyright info, and watermark, and save as a jpg, png, or gif file.
That's it.. all done!
Wednesday, September 16, 2009


Subscribe to:
Posts (Atom)