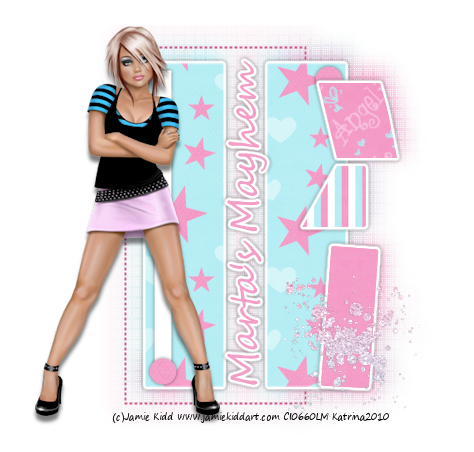

Click the tag to preview at full size. This tutorial was written by Marta on February 16, 2009. Any resemblance to any other tutorial is coincidental. Do not copy and paste this tutorial elsewhere on the net. Absolutely NO Scripting and/or translating of this tutorial.
♥♥♥ Just a note about how this tag was inspired. I was listening to the song You'll Never Walk Alone by Elvis, and it brought back the memory of how Larry, my late husband, used to sing this to me all the time. It was one of his all time favorites. Sorry, don't mean to get mushy, but I had a strong feeling for him today, so I would like to dedicate this tag to him. ♥♥♥
For this tutorial you will need:
PSP
Tube or Image of choice
Font of choice (I used DianaCTT and Impact)
EC4 - Gradient Glow
Xenofex2 - Constellation
ScrapKit *Adore Me* by Crystal of Crystal's Designs.
You can purchase it HERE.
I am using the artwork of Anthony Guerra, you can find his licensed art at CILM.
Let's get started:
Open a new image 600x500 and background set to white. Copy & paste doodle1 as a new layer. Duplicate. Image/Mirror/Image/Flip. Merge these 2 layers. Adjust/Add Noise/Set to 59. Copy & paste the beaded-heart as a new layer, and place above the doodles. Add drop shadow to the doodle and heart layers.
Copy & paste the triple-frame as a new layer. Copy & paste paper3 as a new layer. Resize 50%, and move under the frame and place in the center frame. Copy & paste your tube or image of choice, Duplicate, and place in the 1st and 3rd frames. When happy with placement, using your Magic Wand, click inside each frame, make sure you select all areas. Selections/Modify/Expand by 4/Selections/Invert and hit Delete on the tube/image layers and the paper layer. On the paper layer only, Effects/Xenofex2/Constellation/Star Field and keep original image marked. Copy & paste the heart-love as a new layer and place to the upper left of the frame. Copy & paste the lace-up as a new layer, resize as needed. Duplicate. Image/Mirror and place to each side of the middle frame. Add drop shadow to the frame, tube, heart-love and lace-up layers. Merge all these layers.
Add your text and any wordart you would like to add.. Effects/EC4/Gradient Glow/Change color to #FFFFFF and Glow Width to 14. On your text layer, Image/Rotate/Left 5%. I placed the wordart in the middle at the bottom of the tag.
Add any additional butterflies, bows, hearts, or elements of your choice.
Crop or resize to your liking. Add your copyright info, and watermark, and save as a jpg, png, or gif file.
That's it.. all done!


No comments:
Post a Comment