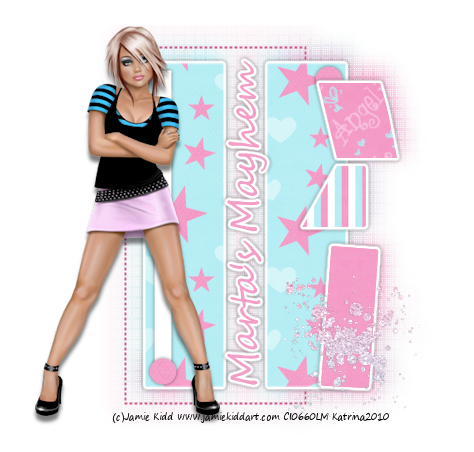

Click the tag to preview at full size. This tutorial was written by Marta on January 30, 2009. Any resemblance to any other tutorial is coincidental. Do not copy and paste this tutorial elsewhere on the net. Absolutely NO Scripting and/or translating of this tutorial.
For this tutorial you will need:
PSP
Tube of choice
Font of choice (I used DianaCTT)
Mask - Zuzzanna_mask 36 - You can download from her site HERE
EC4-Gradient Glow
DSB Flux/Bright Noise
Animation Shop
ScrapKit *Seeing Squares* by Impy of Impy Provisations
You can purchase it HERE
I am using the artwork of PinUpToons, you can find his licensed art at CILM.
Let's get started:
Open a new image 500x600 and background set to white. Copy & paste paper7 as a new layer. Open Zuzzanna_mask36, Layers/New Mask Layer/From Image and find the mask in the drop down list. Delete mask layer, and merge group.
Copy & paste frame2 as a new layer. Copy & paste paper6 as a new layer and move under frame layer. Copy & paste your tube of choice and move between the frame and paper layers. Using your Magic Wand, click inside the frame, Selections/Modify/Expand by 5/Selections/Invert and hit Delete on the tube and paper layers. Add drop shadow to your tube and frame layers.
Copy & paste stitch1 as a new layer. Add drop shadow. Duplicate 2 times. Position the stitch layers so it is on 3 sides of the frame by rotating left or right. Copy & paste the foliage, ribbon2, sequinsquare2, flower1, flower2, flower3 and any additional elements of your choice. Add drop shadow.
Crop or resize to your liking. Add your text, copyright info, and watermark.
Copy & paste sequinborder2 as a new layer. Move to the right of the frame. Using your Eraser tool, erase any that is on the outside of the frame. Rename this layer Sequin1. Duplicate 2 more times and rename Sequin2 and Sequin3. In your layer palette, they should be in order 1, 2, 3. On the Sequin1 layer, Effects/DSB Flux/Bright Noise/Set to Mix/Intensity 22. On the Sequin2 layer, Effects/DSB Flux/Bright Noise/Set to Mix/Intensity 32. On the Sequin3 layer, Effects/DSB Flux/Bright Noise/Set to Mix/Intensity 42. Now we're going to take our tag over to Animation Shop.
Make sure layers Sequin2 and Sequin3 layers are x'ed out. Right click on your tag, Copy Merged and paste as a new animation in animation shop. Go back to PSP, make sure Sequin1 and Sequin3 are x'ed out. Right click on your tag, Copy Merged and right click on your tag in AS, paste after current frame. Go back to PSP, make sure Sequin1 and Sequin2 are x'ed out. Right click on your tag, Copy Merged and right click on your tag in AS, paste after current frame. You should now have 3 frames in AS. Click on the View Animation in the toolbar to make sure the animation is working and that you are satisfied with your result. File/Save As and save your new tag.
That's it.. all done!


No comments:
Post a Comment