
This tutorial was written by Marta on January 16, 2009. Any resemblance to any other tutorial is coincidental. Do not copy and paste this tutorial elsewhere on the net. Absolutely NO Scripting and/or translating of this tutorial.
For this tutorial you will need:
PSP
Tube of choice
Template #57 by Yvette of Essence Of Creativity, you can download it HERE
Font of choice (I'm using WaterBrush)
Mask - Becky_Mask022
ScrapKit *BROKEN WING* by Tamara of Just A Girls Designs.
You can purchase it HERE.
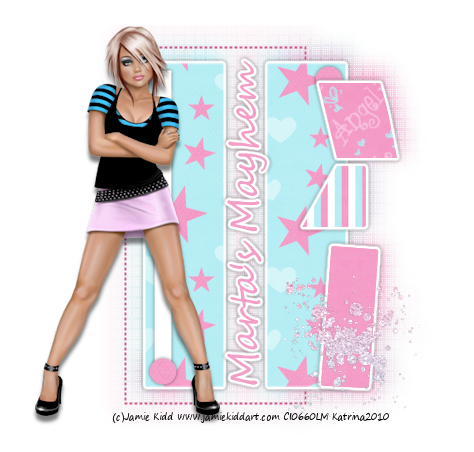
I am using the artwork of Alayna Magnan, you can find her licensed art at CILM.
Let's get started:
Open Yvette's template #57, Shift D, and close out the original. Delete raster layer 1. Image/Canvas Size/650x500., placement center. Click on the rounded rectangle layer, Selections/Select All/Float/Defloat/Modify/Smooth/Set to 10. Copy & paste Background3 as a new layer, Selections/Invert/hit Delete. Click on the heart layer, Selections/Select All/Float/Defloat/Modify/Smooth/Set to 10. Copy & paste Background1 as a new layer, Selections/Invert/hit Delete. Add a drop shadow to both layers with the settings, V 0, H 0, Opacity 69, Blur 14. Click on the heart layer, Image/Free Rotate/Rotate Left 14.
Copy & paste roses2 and the pagewrap and position to your liking. Copy & paste the ropeheart, Adjust/Hue and Saturation/Colorize/H 239, S 53/Adjust/Brightness and Contrast/Brightness/Contrast/Set to B -33, C 9. Place at the knot of the pagewrap.
Copy & paste black and red splatters and the flowing hearts. Add any additional doodles, wordart, or elements of your choice. I typed the words LOVE HURTS and set to soft light.
For the wings, I used the angelwings and using the Selection tool, set to rectangle, I drew a rectangle around the right side and to the middle, basically separating them in half, and cut and paste as a new layer. Resize and position them on the back of the tube. Using this tube it worked very well, not sure how it would be using different tubes, just have to try it and see.
Click on your white background layer, and copy & paste background8 as a new layer. Open Becky_Mask022, Layers/New Mask Layer/From Image and find the mask in the drop down list. Delete mask layer, and merge group. Duplicate/Image/Mirror/Flip. Effects/Texture Effects/Weave/Set all to 1, weave & gap color to #ffffff, and Fill gaps checked to both layers and merge these 2 layers.
Crop or resize to your liking. Add your text, copyright info, and watermark, and save as a jpg, png, or gif file.
That's it.. all done!


No comments:
Post a Comment